Go RVing uses cookies on gorving.com in accordance with our privacy policy. By using this site, you consent to the use of cookies. We use cookies for the following purposes: To enable certain functions of the service, to provide analytics, to store your preferences, and to enable advertisements delivery, including behavioral advertising.
Ryan Robinson takes you for a ride in the passenger seat of his RV, off the grid, deep among the dramatic rock formations of the Utah Desert. Robinson and friends chill by the fire, tell stories, and of course, rig a one of a kind highline over the Looking Glass Arch in Moab, UT.
Temps are warming up, which means camping season is right around the corner and it’s time to de-winterize your RV. Follow these steps to get your RV plumbing system, interior, exterior, and chassis ready for use.
De-winterizing your RV means readying your plumbing system, interior, exterior, and chassis for use. One of the most important steps in your de-winterizing routine is flushing out and sanitizing your RV water system.
De-Winterizing RV Water Systems
There are two important tasks to accomplish when de-winterizing your RV water system:
Remove the RV antifreeze from the plumbing system.
Sanitize the RV water system so it is safe to use.
If you use non-toxic RV antifreeze during your winterizing process, you need to run fresh potable water through the entire plumbing system until all traces of the RV antifreeze are removed. To do this, connect a potable water drinking hose to the city water connector on the RV and run fresh water through the entire plumbing system, including sinks, the shower, the outside shower, toilets, and the washing machine (if applicable).
Once the RV antifreeze is removed, reinstall any water filter cartridges that were removed for winter storage. The RV antifreeze is now in the gray and black water holding tanks and ready to be emptied when you have access to a suitable waste disposal site.
After the plumbing system is flushed, take the water heater out of the by-pass mode (if applicable). If you didn’t bypass the water heater during the winterization process then the water heater tank will be full of antifreeze and needs to be drained and collected in buckets.
Important note: If you added non-toxic RV antifreeze directly to the fresh water holding tank when the unit was winterized, you should first drain any remnants of antifreeze from the tank. Drain the antifreeze into a bucket or container so it doesn’t drain directly on the ground. Next, add potable water to the fresh water holding tank, turn the 12-volt water pump on, and open all of the water faucets. When you see clear water running throughout the system, turn the water pump off and close the faucets.
How To Sanitize Your RV Water System
Make sure to close all drains and reinstall any drain plugs.
Take a quarter-cup of household bleach for every 15 gallons of water your fresh water tank holds. Mix the bleach with water into a 1-gallon container and pour the solution into the fresh water holding tank. (Important note: If your RV doesn’t have a fresh water fill location, pour the water/bleach solution directly into one end of a potable RV drinking hose that’s connected to the RV prior to connecting the opposite end of the hose to a potable water supply.)
Fill the fresh water holding tank completely full of potable water.
Turn the water pump on and run water through all hot and cold faucets until you smell the bleach at each tap.
Close the faucets and let the solution sit in the fresh water holding tank and water lines for at least 12 hours.
Drain the water and re-fill the fresh water tank with potable water.
Turn the water pump on and open all faucets, running the water until you no longer smell any bleach. It may be necessary to repeat this process to eliminate all signs of bleach.
Now you can move on to other items in your RV that can be affected by cold weather storage.
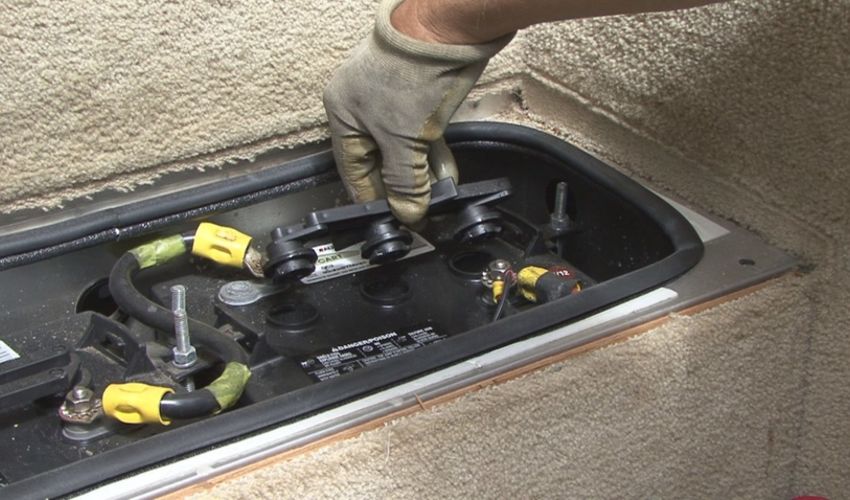
De-Winterizing RV Batteries
Battery condition is dependent on how well the batteries were cared for during winter storage. When batteries are in storage they lose a percentage of current through internal leakage. A battery can discharge up to 10 percent per month when it’s in storage.
Important note: If you removed the batteries for storage, reinstall them and make sure they’re connected properly.
If you checked and recharged the batteries while in storage, they should be ready to go. If not, the first step is to fully charge the batteries. Water should only be added to lead-acid batteries after fully charging the battery unless the water level is already below the plates. The plates need to be covered at all times. After the battery is fully charged check and add distilled water as required.
Caution: If you’re not comfortable working on or around batteries, have battery maintenance done by an authorized RV repair facility.
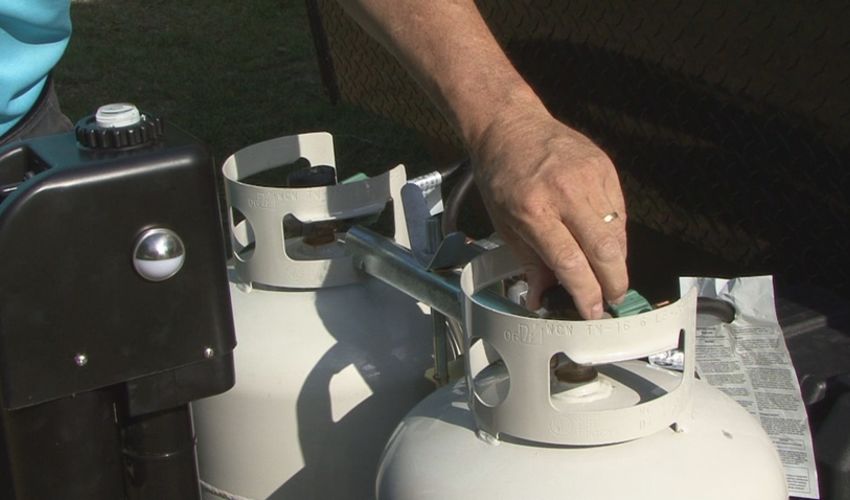
De-Winterizing RV Appliances
Open the LP gas valve at the cylinders or tank and check the operation of all LP gas-fired appliances. Make sure the water heater tank is full of water before testing the operation of the water heater. If an LP gas appliance isn’t operating properly, have it inspected by an authorized RV service facility.
Important note: The LP gas system should have an annual drop pressure and operating pressure test. These tests should be performed by an authorized RV repair facility.
After checking the LP gas appliances for proper operation, plug the RV power cord in and test all 120-volt appliances and accessories. Make sure you have an adequate electrical source (30 to 50 amps depending on your RV’s electrical system) prior to testing items like the microwave and roof air conditioner(s).
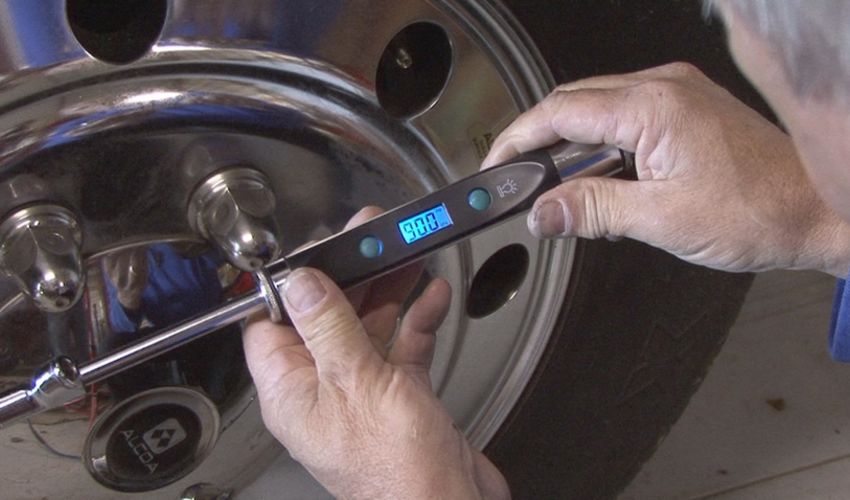
Just like a battery loses a percentage of its charge while in storage, tires lose a percentage of air pressure while in storage. Your RV tires can lose two or more psi a month sitting in storage. Check the tire pressure using a quality tire inflation gauge and adjust the inflation pressure to the manufacturer’s recommended inflation pressure based on the load.
Tip: Tire manufacturers publish load and inflation tables to assist in proper inflation pressure.
De-Winterizing RV Engines And Generators
If you have a motorized RV, check all vehicle fluid levels. Consult your vehicle owner’s manual for proper fluid levels. If a fluid level is low, try to determine why and correct the problem. Start the engine and check for proper readings on all gauges.
If you have an onboard generator, check the oil level and service the generator according to specified intervals found in the generator owner’s manual. Inspect the generator exhaust system for any damage prior to starting the generator.
Caution: Never run a generator with a damaged exhaust system. Carbon monoxide is colorless, odorless, and deadly. If you didn’t use a fuel stabilizer in the fuel system and the generator won’t start, or it continues to surge after starting, have it checked out and repaired by an authorized RV service facility.
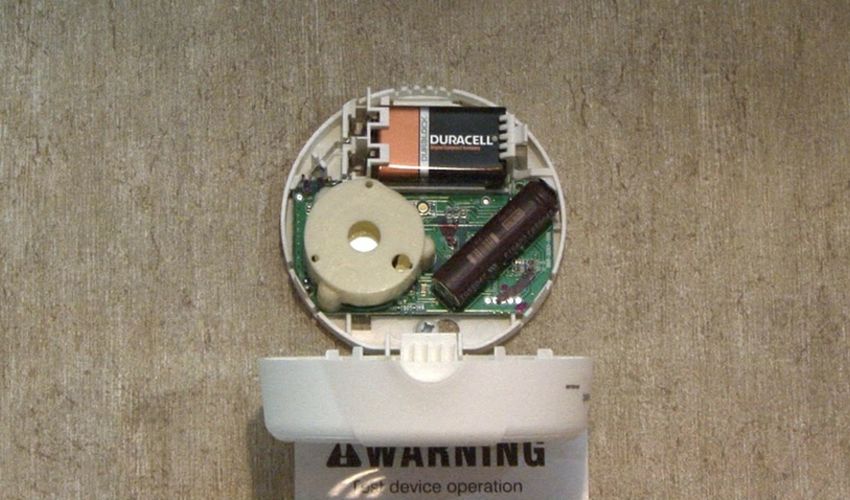
Other RV Safety Items During De-Winterization
Re-install any dry-cell batteries or fuses that were removed from safety devices for storage. If you didn’t remove the batteries, it’s a good idea to replace them now. Test the operation of the carbon monoxide detector, LP gas leak detector, and smoke alarm. Inspect all fire extinguishers to make sure they are serviceable and fully charged. Recharge or replace fire extinguishers as required.
This is just a start to de-winterizing your RV and getting it road-ready. Be sure to also inspect seams and sealants and clean the interior and exterior of the RV. Add items to this list to suit your particular needs and prepare your RV for its first camping trip of the season.
Mark Polk and his wife Dawn created RV Education 101, a video production and RV information company. Since 1999, RV Education 101 has helped educate millions of RV owners and RV enthusiasts on how to properly and safely use and maintain their RVs. Mark’s favorite past times are RVing in their 35-foot Type A motorhome with their two dogs Gracie and Roxie, and restoring vintage RVs, classic cars and trucks. For more information on using, enjoying and maintaining your RV, visit RV Education 101.